16 July 2006

Ike's Wicked Ale, Day 14

Today was the bottling day. I actually had quite a few people on hand to help me out -- Carrie, Jenn, Brian, and Mike. After moving the glass carboy to the countertop, I measured the final specific gravity of the beer. It came out to be 1.017, a little off from the recipe's approximation of 1.012. Could it be that fermentation had not finished? I probably should have waited a few days to take another reading and only continue when stabilized, but I already had my mind on bottling the beers today. At any rate, taking the difference of the original and final gravities and multiplying that by 131 predicts that the alcohol content of Ike's Wicked Ale will be 4.7 percent.

I mixed in the 4 ½ oz. priming sugar in 2 cups of boiling water, and boiled the solution for another minute. After cooling the sugar water, I poured it into the big plastic bucket. Then I siphoned the beer from the glass carboy into the plastic container to get it all mixed up. Several of us tasted the beer at this stage and everyone agreed that it was pretty good as far as flat, room temperature beer can be. I also boiled the bottle caps in water for a few minutes to clean them up. Then we started the assembly line. Carrie sanitized the bottles, Jenn filled them with the beer, then Brian and I capped them. Thanks to all of them for doing such a great job because it would have taken me much longer to do it all myself.

Notes
- My final specific gravity was higher than what Austin Homebrew Supply said it should be. Hopefully I won't have exploding bottles if fermentation is still going strong.

- The bottle capper I have is not the easiest device in the world to use. When pushing down on the handles, it wobbled quite a bit on top of the bottle so getting a cap crimped properly usually took a few tries. An upgrade might be in order if I want to make more batches.

15 July 2006

Olde Frothingslosh


Last night at The Gingerman I saw a hilarious beer can. On the wall by the pool table, there are hundreds of old, unique beer cans. The one that caught my eye was the one labeled Olde Frothingslosh. I wonder whether it tastes more like it looks or more like it sounds.

Close call

I had a close call Thursday morning. I was nearly involved in a motorcycle accident. Normally I carpool to work, but on Thursday I had to go by the post office to pick up a new key to my mailbox so I drove separately on my motorcycle. When I left the post office, I wanted to cut across Jollyville Road onto Pavilion Blvd, but there were quite a few cars travelling in both directions at the time so I decided to just mosey down Jollyville and get on Highway 183 at Braker Lane.

Jollyville Road has a middle turn lane separating two lanes of traffic in both directions. I was following a car south in the lefthand lane, probably going 40-45 miles per hour, and saw a large SUV in the turn lane waiting to merge into southbound traffic. At this point I switched over to the righthand lane to make room for it. Up ahead of me I noticed another SUV, I believe a Ford Explorer, stopped on a side street. All of a sudden, the green Explorer started to pull out directly in front of me. It all happend so fast I don't recall if I honked and applied the brakes properly or not, but I know I hit the rear brake pretty hard because the wheel locked up and I fishtailed a few times. I'm not sure how close the Explorer came to hitting me because I was focused on keeping the bike upright and in control. I believe the other SUV on my left saw most of this happening and made some room for me to get by, so I'm pretty thankful for that. Once I was back under control I looked back and threw up the bird while screaming several expletives into my helmet. I was able to regain my composure waiting at the next traffic signal which wasn't too far ahead. Anyway, the whole experience scared the shit out of me and I'm thankful there wasn't any metal to metal or skin to pavement contact.

New blog feed

I'm going to try and run my blog feed through FeedBurner because Blogger doesn't provide any traffic statistics like I thought it would when I signed up. If you are already subscribed to the old RSS feed, you can subscribe to this feed http://feeds.feedburner.com/iwankerl instead. Apparently there is a way to redirect requests from the old feed to the new one so I will try and set that up in a few minutes.

09 July 2006

Ike's Wicked Ale, Day 7

After letting the beer sit in the primary fermenter for a week, it was time to switch it over to the secondary fermenter. This helps remove a lot of the sediment. This step is not required (I have had plenty of good beers that were kept in the same container for the whole time), but I figured I would follow the directions to increase my chances of having a nice and tasty beverage at the end of the process.

I moved the beer from my kitchen pantry floor onto the counter top and let it sit there for about an hour or two. After I pulled off the top of the plastic bucket, I snapped this photo of the beer. It didn't look too appetizing at this point. You could see a ring around the bucket where the fermentation process had foamed up.

My beer making kit came with a nifty auto-siphon which I got to use for the first time today. I wasn't sure how well it would work, so I tested it out with water and my sanitizing solution. After three or four pumps on the siphon, the tube was full of liquid and gravity kept it flowing after that. It is definitely a nice tool to have. Once I was comfortable working the siphon and everything was cleaned, it was time to transfer the beer. Here you can see me holding the apparatus with the beer flowing through the tubing into the glass carboy secondary fermenter.

When the beer had finished transferring, all I needed to do was put the stopper and air lock onto the carboy. The beer looked much better in the glass container after most of the sediment was left in the plastic bucket. I didn't taste the beer at this stage, but I probably will right before I bottle it. I will probably get around to bottling next weekend. I hope I have enough empty bottles by then!

03 July 2006

Ike's Wicked Ale, Day 1

Last Thursday I dropped by Austin Homebrew Supply to purchase a beer making equipment kit. The only required items that weren't included in the kit were the bottles and a stainless steel stock pot. AHS was out of the cheaper stock pots so my brother Josef said he would lend me his. For the bottles, I originally decided to use the green Dos Equis lager bottles. Unfortunately I'm not drinking them fast enough so I'm just collecting any non-twist-off bottle for now. Perhaps by my second batch of beer I will have a homogeneous set of bottles to use.

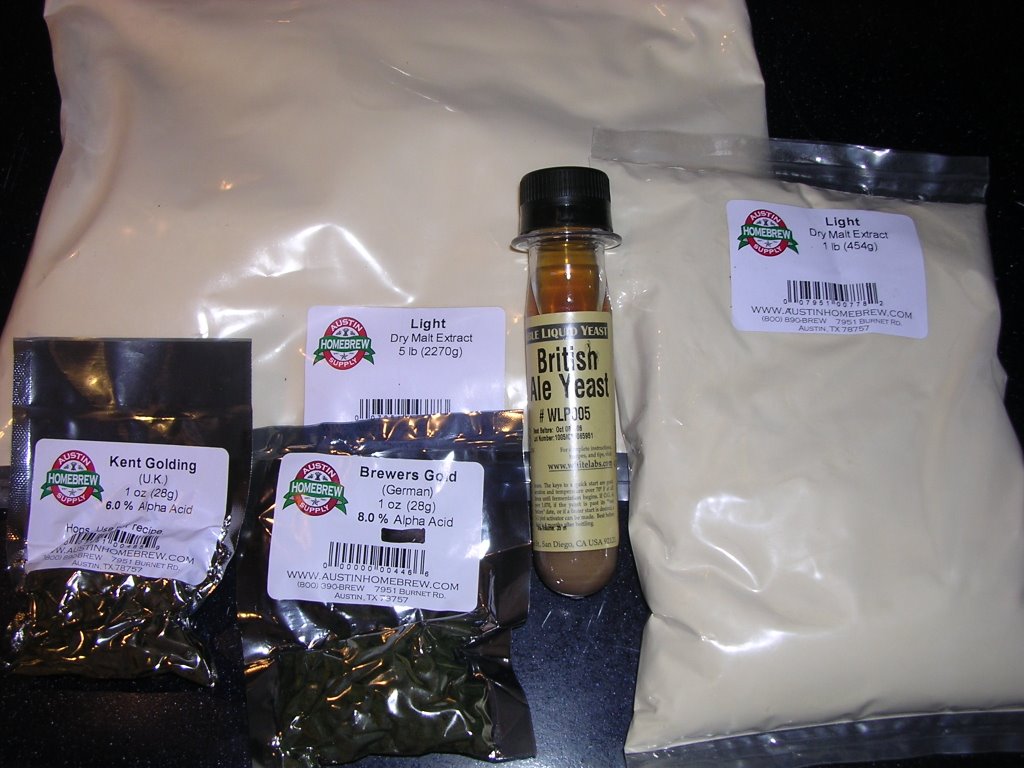
In addition to the equipment, I bought the ingredients to make a beer in the style of Pete's Wicked Ale. AHS has a list of some 700 different recipes to choose from and they print up a nifty instruction sheet/ingredient list for the beer you choose to brew. If all goes well, I should be enjoying my own Ike's Wicked Ale in around five weeks.

Ingredients used

½ lb. Vienna malt
½ lb. Crystal 60L
¼ lb. Chocolate malt
6 lb. light dry malt extract (or 7 ½ lb. liquid pale malt extract)
1 oz. Brewers Gold bittering hops
½ oz. East Kent Golding flavor hops (I'm using slightly more than ½ oz.)
White Labs British Ale Yeast #WLP005 (or Wyeast London 1028 #00032 or Dry Yeast Windsor #00393)

Putting it all together
The first step was letting the yeast warm up to room temperature. I removed it from the refridgerator Saturday evening so it would be ready on Sunday afternoon. The vial label says 3-6 hours is fine but my local brew store recommended up to 24 hours.

Then I had to sanitize all of the equipment. Once the wort is boiled, it contains a lot of sugar and is susceptible to bacteria growth which can ruin the beer. I opted to clean everything with a diluted bleach solution.

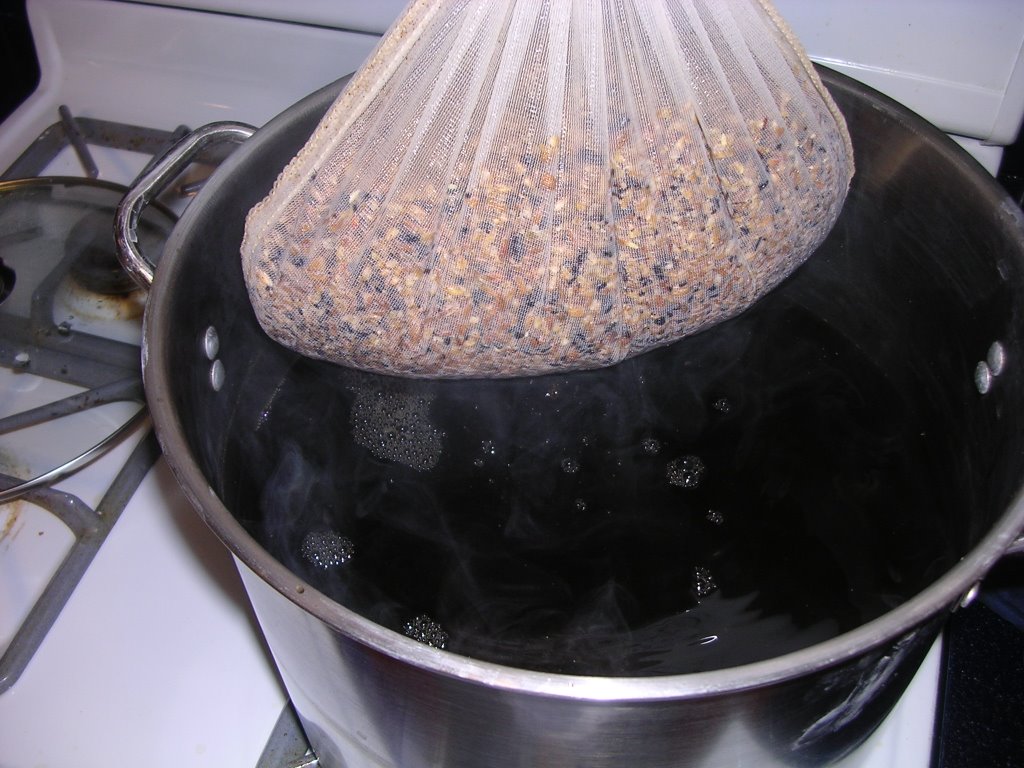
Next I warmed up 2 ½ gallons of water to 155°F and turned off the stove burner. I steeped all of the crushed grains in the water for fifteen minutes, lifting the grain bag in and out of the water. After doing this the water was fairly dark, as seen in the picture.

Once the water returned to a boil, I turned off the burner to add in the malt extract. The extract is very sticky and the steam from the water made it clump up some as I poured it from the bag. It readily disolved in the hot water with continuous stirring during pour. Now I turned on the heat and got the wort to a steady boil. Wort is the name for the mixture of the grains and water and sugars.

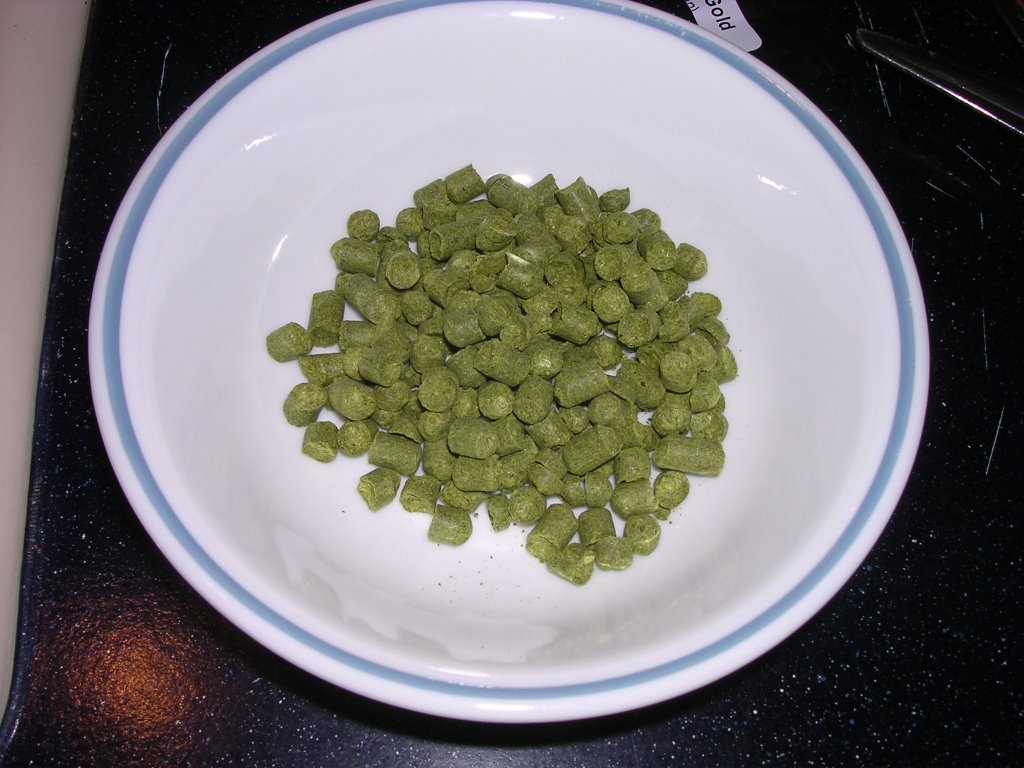
Once I had a nice rolling boil without boiling over, I added the Brewers Gold hops seen here for bittering and set my timer for 45 minutes. When the timer went off, I added the East Kent Golding hops for flavoring and reset the timer to 15 minutes.


The next step was to quickly cool down the wort to 80°F. I filled up my sink with cold tap water and ice, and then carried the hot stock pot over and set it in the water. The recipe says this process should ideally take 15-20 minutes, but my wort was still too warm after that period of time. Once it dropped to a little over 90°F, I poured the wort into the plastic primary fermenter.

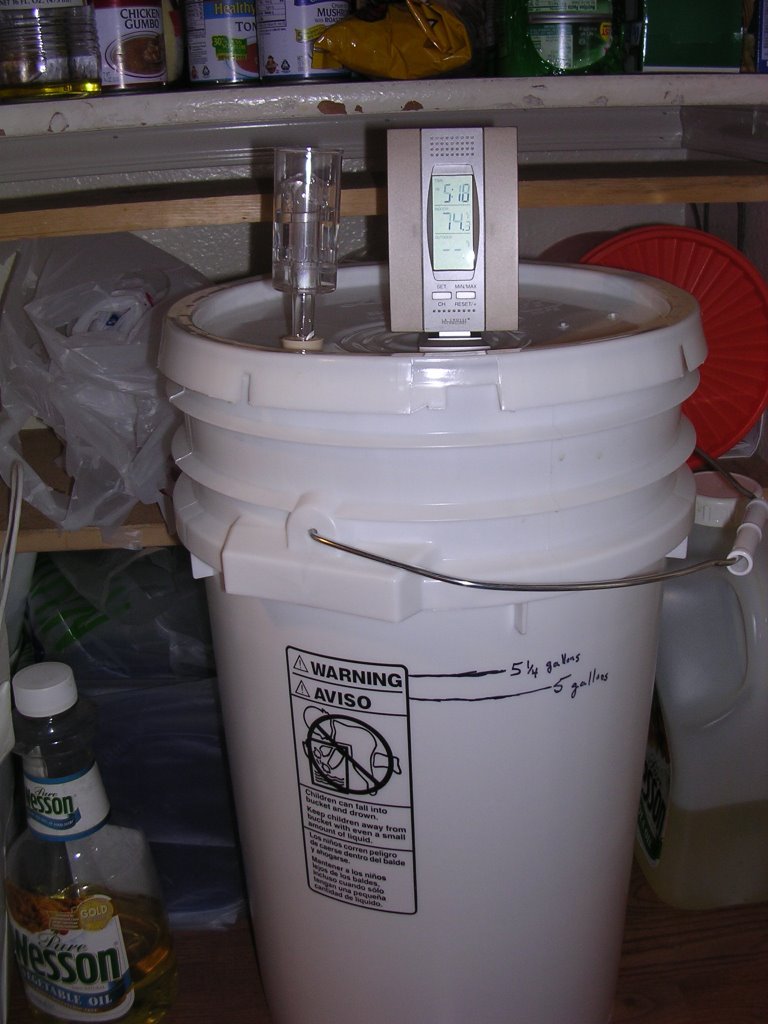
Using my trusty Wurstfest pitcher, I added enough cool tap water to fill the primary fermenter to 5 ¼ gallons. I had previously marked the spot on the side of the bucket to make this easier.Now it was time to measure the specific gravity of the wort using my hydrometer. It was kind of difficult to read an exact measurement because of the bubbles, but I would say that it ended up being 1.053, plus or minus one thousandth. I was pretty happy with this because it was exactly what the recipe said it should be. This is one of the measurements used to calculate the alcohol content of the beer. I have to take a second reading right before bottling and then I can determine how potent the beer will be.

The last step of the day was adding the yeast. I shook the vial vigorously to mix the yeast up, and then poured it into the fermenter. After several good stirs of the wort to mix it all up, I placed the top securely on the primary fermenter and put some water into the airlock. The top was pretty stuburn and I wasn't sure if I got it all sealed correctly, but when I checked on it Monday morning, the carbon dioxide was escaping through the airlock so it was a success.

Notes
- The floating thermometer is too tall for the pot I used so it would rest on the metal bottom unless I held it. I plan on making a contraption to hold it upright and suspended in the liquid.

- Adding the dry malt extract is cumbersome for one person to do because you have to continuously stir the pot so the malt disolves. I wasn't really expecting to do all this myself, but I couldn't wake up my lovely brewer's assistant from her afternoon nap.

- A large measuring cup would be cool to have. I ended up using a quart water bottle to determine how large my Wurstfest beer pitcher was – two quarts. Then I used the pitcher for measuring 2 ½ gallons for the stock pot and the 5 ¼ gallons level on the primary fermenter.

- Chilling the wort took longer than I expected. You can purchase a wort chiller to speed up this process, but I'm not sure if I will get one just yet.

02 July 2006

Beginning homebrew

Today I started my first batch of homebrew. Since the process of making beer spans several weeks, this presented the perfect opportunity for me to start up a blog and document the process. My goal, besides making good beer, is to have a record of my batches so that I can refer back to my notes here and determine either what worked or what went wrong.

This blog will not pertain to just homebrewing. Although I am sure the majority of the initial posts will be of that subject, this is a personal blog which will probably span a wide spectrum of thoughts which I wish to share with others.